So last week we had the two fleets, set up for battle. Now for a bit of action. The route of the British battlecruiser fleet took it through the patrol sector allocated to the German submarine U-32. After receiving the order to commence the operation, the U-boat moved to a position 80 miles east of the Isle of May at dawn on 31 May. At 03:40, it sighted the cruisers HMS Galatea and HMS Phaeton leaving the Forth at 18 knots. It launched one torpedo at the leading cruiser at a range of 1,000 yards, but its periscope jammed ‘up’, giving away the position of the submarine as it manoeuvred to fire a second. The lead cruiser turned away to dodge the torpedo, while the second turned towards the submarine, attempting to ram. U-32 crash dived and, on raising its periscope at 04:10, saw two battlecruisers (the 2nd Battlecruiser Squadron) heading south-east. They were too far away to attack, but the sighting of two battleships and two cruisers were reported to Germany. U-66 was also supposed to be patrolling off the Firth of Forth, but had been forced north to a position 60 miles off Peterhead by patrolling British vessels. This now brought it into contact with the 2nd Battle Squadron, coming from the Moray Firth. At 05:00, it had to crash dive when the cruiser HMS Duke of Edinburgh appeared from the mist heading toward it. It was followed by another cruiser, HMS Boadicea and eight battleships. U-66 got within 350 yards of the battleships preparing to fire, but was forced to dive by an approaching destroyer and missed the opportunity. At 06:35, it reported eight battleships and cruisers heading north. The courses reported by both submarines were incorrect, because they reflected one leg of a zigzag being used by British ships to avoid submarines. Taken with a wireless intercept of more ships leaving Scapa Flow earlier in the night, they created the impression in the German High Command that the British fleet, whatever it was doing, was split into separate sections moving apart, which was precisely as the Germans wished to meet it. Jellicoe’s ships proceeded to their rendezvous undamaged and undiscovered. However, he was now misled by an Admiralty intelligence report advising that the German main battle fleet was still in port. The Director of Operations Division had asked the intelligence division for the current location of German call sign DK, used by Admiral Scheer. They had replied that it was currently transmitting from Wilhelmshaven. It was known to the intelligence staff that Scheer deliberately used a different call sign when at sea, but no one asked for this information or explained the reason behind the query – to locate the German fleet. The German battlecruisers cleared the minefields surrounding the Amrum swept channel by 09:00. They then proceeded north-west, passing 35 miles west of the Horn’s Reef lightship heading for the Little Fisher Bank at the mouth of the Skagerrak. The High Seas Fleet followed some 50 miles behind. The battlecruisers were in line ahead, with the four cruisers of the II scouting group plus supporting torpedo boats ranged in an arc 8 miles ahead and to either side. The IX torpedo boat flotilla formed close support immediately surrounding the battlecruisers. The High Seas Fleet similarly adopted a line-ahead formation, with close screening by torpedo boats to either side and a further screen of five cruisers surrounding the column 5 to 8 miles away. The wind had finally moderated so that Zeppelins could be used, and by 11:30 five had been sent out. Visibility, however, was still bad, with clouds down to 1,000 feet.
By around 14:00, Beatty’s ships were proceeding eastward at roughly the same latitude as Hipper’s squadron, which was heading north. Had the courses remained unchanged, Beatty would have passed between the two German fleets, 40 miles south of the battlecruisers and 20 miles north of the High Seas Fleet at around 16:30, possibly trapping his ships just as the German plan envisioned. His orders were to stop his scouting patrol when he reached a point 260 miles east of Britain and then turn north to meet Jellicoe, which he did at this time. Beatty’s ships were divided into three columns, with the two battlecruiser squadrons leading in parallel lines three miles apart. The 5th Battle Squadron was stationed 5 miles to the north-west, on the side furthest away from any expected enemy contact, whilst a screen of cruisers and destroyers was spread south-east of the battlecruisers. After the turn, the 5th Battle Squadron was now leading the British ships in the westernmost column, and Beatty’s squadron was centre and rearmost, with the 2nd BCS to the west.

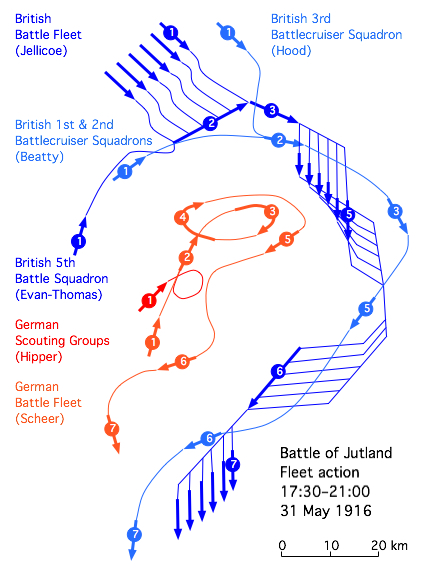
(1) 15:22hrs, Hipper sights Beatty.
(2) 15:48hrs, First shots fired by Hipper’s squadron.
(3) 16:00hrs-16:05hrs, HMS Indefatigable explodes, leaving two survivors.
(4) 16:25hrs, HMS Queen Mary explodes, nine survive.
(5) 16:45hrs, Beatty’s battlecruisers move out of range of Hipper.
(6) 16:54hrs, Evan-Thomas’s battleships turn north behind Beatty.
At 14:20 on 31 May, despite heavy haze and scuds of fog giving poor visibility, scouts from Beatty’s force reported enemy ships to the south-east; the British light units, investigating a neutral Danish steamer which was stopped between the two fleets, had found two German destroyers engaged on the same mission. The first shots of the battle were fired at 14:28 when HMS Galatea and HMS Phaeton of the British 1st Light Cruiser Squadron opened on the German torpedo boats, which withdrew toward their approaching light cruisers. At 14:36, the Germans scored the first hit of the battle when SMS Elbing of Scouting Group II hit her British counterpart HMS Galatea at extreme range. Beatty began to move his battlecruisers and supporting forces south-eastwards and then east to cut the German ships off from their base and ordered HMS Engadine to launch a seaplane to try to get more information about the size and location of the German forces. This was the first time in history that a carrier-based aeroplane was used for reconnaissance in naval combat. HMS Engadine’s aircraft did locate and report some German light cruisers just before 15:30 and came under anti-aircraft gunfire but attempts to relay reports from the aeroplane failed. Unfortunately for Beatty, his initial course changes at 14:32 were not received by the 5th Battle Squadron (the distance being too great to read his flags), because the battlecruiser HMS Tiger, the last ship in his column, was no longer in a position where she could relay signals by searchlight to Evan-Thomas, as she had previously been ordered to do. Whereas before the north turn, HMS Tiger had been the closest ship to Evan-Thomas, she was now further away than Beatty in HMS Lion. Matters were aggravated because Evan-Thomas had not been briefed regarding standing orders within Beatty’s squadron, as his squadron normally operated with the Grand Fleet. Fleet ships were expected to obey movement orders precisely and not deviate from them. Beatty’s standing instructions expected his officers to use their initiative and keep station with the flagship. As a result, the four Queen Elizabeth-class battleships, which were the fastest and most heavily armed in the world at that time, remained on the previous course for several minutes, ending up ten miles behind rather than five. Beatty also had the opportunity during the previous hours to concentrate his forces, and no reason not to do so, whereas he steamed ahead at full speed, faster than the battleships could manage. Dividing the force had serious consequences for the British, costing them what would have been an overwhelming advantage in ships and firepower during the first half-hour of the coming battle. With visibility favouring the Germans, at 15:22 Hipper’s battlecruisers, steaming approximately north-west, sighted Beatty’s squadron at a range of about fifteen miles, whilst Beatty’s forces did not identify Hipper’s battlecruisers until 15:30. (position 1 on the above map). At 15:45, Hipper turned south-east to lead Beatty toward Scheer, who was forty-six miles south-east with the main force of the High Seas Fleet. Beatty’s conduct during the next fifteen minutes has received a great deal of criticism, as his ships out-ranged and outnumbered the German squadron, yet he held his fire for over ten minutes with the German ships in range. He also failed to use the time available to rearrange his battlecruisers into a fighting formation, with the result that they were still manoeuvring when the battle started. At 15:48, with the opposing forces roughly parallel at fifteen thousand yards, with the British to the south-west of the Germans (i.e., on the right side), Hipper opened fire, followed by the British ships as their guns came to bear upon targets (position 2). Thus began the opening phase of the battlecruiser action, known as the ‘Run to the South’, in which the British chased the Germans, and Hipper intentionally led Beatty toward Scheer. During the first minutes of the ensuing battle, all the British ships except HMS Princess Royal fired far over their German opponents, due to adverse visibility conditions, before finally getting the range. Only HMS Lion and HMS Princess Royal had settled into formation, so the other four ships were hampered in aiming by their own turning. Beatty was to windward of Hipper, and therefore funnel and gun smoke from his own ships tended to obscure his targets, while Hipper’s smoke blew clear. Also, the eastern sky was overcast and the grey German ships were indistinct and difficult to range.

Beatty had ordered his ships to engage in a line, one British ship engaging with one German and his flagship, HMS Lion, doubling on the German flagship SMS Lützow. However, due to another mistake with signalling by flag, and possibly because HMS Queen Mary and HMS Tiger were unable to see the German lead ship because of smoke, the second German ship, Derfflinger, was left un-engaged and free to fire without disruption. SMS Moltke drew fire from two of Beatty’s battlecruisers, but still fired with great accuracy during this time, hitting HMS Tiger nine times in the first twelve minutes. The Germans drew first blood. Aided by superior visibility, Hipper’s five battlecruisers quickly registered hits on three of the six British battlecruisers. Seven minutes passed before the British managed to score their first hit. The first near-kill of the Run to the South occurred at 16:00, when a twelve-inch shell from Lützow wrecked the ‘Q’ turret amidships on Beatty’s flagship Lion. Dozens of crewmen were instantly killed, but far larger destruction was averted when the mortally wounded turret commander promptly ordered the magazine doors shut and the magazine flooded. This prevented a magazine explosion at 16:28, when a flash fire ignited cordite charges beneath the turret and killed everyone in the chambers outside ‘Q’ magazine. Lion was saved, but HMS Indefatigable was not so lucky, as at 16:02, just 14 minutes into the gunnery exchange, she was hit aft by three eleven-inch shells from SMS Von der Tann, causing damage sufficient to knock her out of line and detonating ‘X’ magazine aft. Soon after, despite the near-maximum range, Von der Tann put another eleven-inch shell on Indefatigable’s ‘A’ turret forward. The plunging shells probably pierced the thin upper armour, and seconds later Indefatigable was ripped apart by another magazine explosion, sinking immediately and leaving only two survivors from her crew of 1,019 officers and men (position 3). Hipper’s position deteriorated somewhat by 16:15 as the 5th Battle Squadron finally came into range, so that he had to contend with gunfire from the four battleships astern as well as Beatty’s five remaining battlecruisers to starboard. But he knew his baiting mission was close to completion, as his force was rapidly closing with Scheer’s main body. At 16:08, the lead battleship of the 5th Battle Squadron, HMS Barham, caught up with Hipper and opened fire at extreme range, scoring a 15-inch hit on Von der Tann within 60 seconds. Still, it was 16:15 before all the battleships of the 5th were able to fully engage at long range. At 16:25, the battlecruiser action intensified again when HMS Queen Mary was hit by what may have been a combined salvo from Derfflinger and Seydlitz. She disintegrated when both forward magazines exploded, sinking with all but nine of her 1,275 man crew lost. (position 4).

During the Run to the South, from 15:48 to 16:54, the German battlecruisers made an estimated total of forty-two eleven and twelve-inch hits on the British battlecruisers. Shortly after 16:26, a salvo struck on or around HMS Princess Royal, which was obscured by spray and smoke from shell bursts. But she was still afloat after the spray cleared. At 16:30, Scheer’s leading battleships sighted the distant battlecruiser action and soon after wards HMS Southampton sighted the main body of Scheer’s High Seas Fleet, dodging numerous heavy-calibre salvos to report in detail the German strength: 16 dreadnoughts with six older battleships. This was the first news that Beatty and Jellicoe had that Scheer and his battle fleet were even at sea. Simultaneously, an all-out destroyer action raged in the space between the opposing battlecruiser forces, as British and German destroyers fought with each other and attempted to torpedo the larger enemy ships. Each side fired many torpedoes, but both battlecruiser forces turned away from the attacks and all escaped harm except Seydlitz, which was hit forward at 16:57 by a torpedo fired by a British destroyer. Though taking on water, Seydlitz maintained speed. The destroyer HMS Nestor led the British attacks. The British disabled the German torpedo boat V27, which the Germans soon abandoned and sank, and Petard then torpedoed and sank V29, her second score of the day. But HMS Nestor and HMS Nomad were immobilised by shell hits, and later sunk by Scheer’s passing dreadnoughts. Bingham was rescued and awarded the Victoria Cross for his leadership in the destroyer action.
There was now a run to the North, where the Germans chased the British, in which the tables turned. But because Beatty once again failed to signal his intentions adequately, the battleships of the 5th Battle Squadron – which were too far behind to read his flags – found themselves passing the battlecruisers on an opposing course and heading directly toward the approaching main body of the High Seas Fleet. Having received Goodenough’s signal and knowing that Beatty was now leading the German battle fleet north to him, Jellicoe signalled to his own forces that the fleet action they had waited so long for was finally imminent and so at 16:51 he informed the Admiralty in London of this. But the difficulties of the 5th Battle Squadron were compounded when Beatty gave the order to Evan-Thomas to “turn in succession”, rather than “turn together” as the battleships passed him. Evan-Thomas acknowledged the signal, but Beatty’s flag lieutenant aggravated the situation when he did not haul down the flags (to execute the signal) for some minutes. So, when the 5BS had moved within range of the enemy battleships, Evan-Thomas issued his own flag command warning his squadron to expect sudden manoeuvres and to follow his lead, before starting to turn on his own initiative. The order to turn in succession would have resulted in all four ships turning in the same patch of sea as they reached it one by one, giving the High Seas Fleet repeated opportunity with ample time to find the proper range. But the captain of the trailing ship, HMS Malaya, turned early, mitigating the adverse results. For the next hour, the 5th Battle Squadron acted as Beatty’s rearguard, drawing fire from all the German ships within range, while Beatty soon deliberately eased his own squadron out of range of Hipper’s now-superior battlecruiser force. Since both visibility and firepower now favoured the Germans, there was no incentive for Beatty to risk further battlecruiser losses when his own gunnery could not be effective. Illustrating the imbalance, Beatty’s battlecruisers did not initially score any hits on the Germans in this phase, but they had rapidly received five more before he opened the range. The four battleships were far better suited to take this sort of pounding than the battlecruisers, and none were lost, though HMS Malaya suffered heavy damage, an ammunition fire, as well as heavy crew casualties. At the same time, the fifteen-inch fire of the four British ships was accurate and effective. As the two British squadrons headed north at top speed, eagerly chased by the entire German fleet, the 5th Battle Squadron scored thirteen hits on the enemy battlecruisers, although only one, on SMS Markgraf, did any serious damage). (position 6).
Now the fleets were converging and as a result, Jellicoe was now aware that full fleet engagement was nearing, but had insufficient information on the position and course of the Germans. To assist Beatty, early in the battle Jellicoe had ordered Rear-Admiral Hood’s 3rd Battlecruiser Squadron to speed ahead to find and support Beatty’s force, and Hood was now racing SSE well in advance of Jellicoe’s northern force. Rear-Admiral Arbuthnot’s 1st Cruiser Squadron patrolled the van of Jellicoe’s main battleship force as it advanced steadily to the south-east. At 17:38, the scout cruiser HMS Chester, screening Hood’s oncoming battlecruisers, was intercepted by the van of the German scouting forces under Rear-Admiral Boedicker. Heavily outnumbered by Boedicker’s four light cruisers, HMS Chester was pounded before being relieved by Hood’s heavy units, which swung westward for that purpose. Boedicker’s ships turned toward Hipper and Scheer in the mistaken belief that Hood was leading a larger force of British capital ships from the north and east. A chaotic destroyer action in mist and smoke ensued as German torpedo boats attempted to blunt the arrival of this new formation, but Hood’s battlecruisers dodged all the torpedoes fired at them.
(1) 18:00 Scouting forces rejoin their respective fleets.
(2) 18:15 British fleet deploys into battle line
(3) 18:30 German fleet under fire turns away
(4) 19:00 German fleet turns back
(5) 19:15 German fleet turns away for second time
(6) 20:00
(7) 21:00 Nightfall: Jellicoe assumes night cruising formation
Now there was fleet action, as Beatty and Evan-Thomas had resumed their engagement with Hipper’s battlecruisers, this time with the visual conditions to their advantage. With several of his ships damaged, Hipper turned back toward Scheer at around 18:00, just as Beatty’s flagship HMS Lion was finally sighted from Jellicoe’s flagship, HMS Iron Duke. Jellicoe twice demanded the latest position of the German battlefleet from Beatty, who could not see the German battleships and failed to respond immediately to the question. Meanwhile, Jellicoe received confused sighting reports of varying accuracy and limited usefulness from light cruisers and battleships on the starboard (southern) flank of his force. Jellicoe was in a worrying position. He needed to know the location of the German fleet to judge when and how to deploy his battleships from their cruising formation (six columns of four ships each) into a single battle line. The deployment could be on either the westernmost or the easternmost column, and had to be carried out before the Germans arrived; but early deployment could mean losing any chance of a decisive encounter. Deploying to the west would bring his fleet closer to Scheer, gaining valuable time as dusk approached, but the Germans might arrive before the manoeuvre was complete. Deploying to the east would take the force away from Scheer, but Jellicoe’s ships might be able to cross the “T”, and visibility would strongly favour British gunnery – Scheer’s forces would be silhouetted against the setting sun to the west, while the Grand Fleet would be indistinct against the dark skies to the north and east, and would be hidden by reflection of the low sunlight off intervening haze and smoke. Deployment would take twenty irreplaceable minutes, and the fleets were closing at full speed. In one of the most critical and difficult tactical command decisions of the entire war, Jellicoe ordered deployment to the east at 18:15. Meanwhile, Hipper had rejoined Scheer, and the combined High Seas Fleet was heading north, directly toward Jellicoe. Scheer had no indication that Jellicoe was at sea, let alone that he was bearing down from the north-west, and was distracted by the intervention of Hood’s ships to his north and east. Beatty’s four surviving battlecruisers were now crossing the van of the British dreadnoughts to join Hood’s three battlecruisers and there was confusion on both sides. Numerous British light cruisers and destroyers on the south-western flank of the deploying battleships were also crossing each other’s courses in attempts to reach their proper stations, often barely escaping collisions, and under fire from some of the approaching German ships. This period of peril and heavy traffic attending the merger and deployment of the British forces later became known as “Windy Corner”.

As HMS Defence sank and HMS Warspite circled, Hipper moved within range of Hood’s 3rd Battlecruiser Squadron, but was still also within range of Beatty’s ships. At first, visibility favoured the British, but at 18:30, HMS Invincible abruptly appeared as a clear target before two German ships who then fired three salvoes each at HMS Invincible and sank her in 90 seconds. A 12-inch shell from the third salvo struck HMS Invincible’s Q-turret amidships, detonating the magazines below and causing her to blow up and sink. All but six of her crew of 1,032 officers and men, including Rear-Admiral Hood, were killed. Of the remaining British battlecruisers, only HMS Princess Royal received heavy-calibre hits. By 18:30, the main battle fleet action was joined for the first time, with Jellicoe effectively “crossing Scheer’s T”. The officers on the lead German battleships, and Scheer himself, were taken completely by surprise when they emerged from drifting clouds of smoky mist to suddenly find themselves facing the massed firepower of the entire Grand Fleet main battle line, which they did not know was even at sea. Jellicoe’s flagship HMS Iron Duke quickly scored seven hits on the lead German dreadnought, SMS König, but in this brief exchange, which lasted only minutes, as few as 10 of the Grand Fleet’s 24 dreadnoughts actually opened fire. The Germans were hampered by poor visibility, in addition to being in an unfavourable tactical position, just as Jellicoe had intended. Realising he was heading into a death trap, Scheer ordered his fleet to turn and disengage at 18:33. Under a pall of smoke and mist, Scheer’s forces succeeded in disengaging by an expertly executed 180° turn in unison, which was a well-practised emergency manoeuvre of the High Seas Fleet. Conscious of the risks to his capital ships posed by torpedoes, Jellicoe did not chase directly but headed south, determined to keep the High Seas Fleet west of him.

Commodore Goodenough’s 2nd Light Cruiser Squadron dodged the fire of German battleships for a second time to re-establish contact with the High Seas Fleet shortly after 19:00. By 19:15, Jellicoe had crossed Scheer’s “T” again. This time his arc of fire was tighter and deadlier, causing severe damage to the German battleships. At 19:17, for the second time in less than an hour, Scheer turned his outnumbered and out-gunned fleet to the west using the “battle about turn”, but this time it was executed only with difficulty, as the High Seas Fleet’s lead squadrons began to lose formation under concentrated gunfire. To deter a British chase, Scheer ordered a major torpedo attack by his destroyers and a potentially sacrificial charge by Scouting Group I’s four remaining battlecruisers. In this brief but intense portion of the engagement, from about 19:05 to about 19:30, the Germans sustained a total of 37 heavy hits while inflicting only two. Whilst his battlecruisers drew the fire of the British fleet, Scheer slipped away, laying smoke screens. Meanwhile, from about 19:16 to about 19:40, the British battleships were also engaging Scheer’s torpedo boats, which executed several waves of torpedo attacks to cover his withdrawal. Jellicoe’s ships turned away from the attacks and successfully evaded all thirty-one of the torpedoes launched at them. This action, and the turn away, cost the British critical time and range in the last hour of daylight – as Scheer intended, allowing him to get his heavy ships out of immediate danger. The last major exchanges between capital ships in both this battle and in the war took place just after sunset, from about 20:19 to about 20:35, as the surviving British battlecruisers caught up with their German counterparts. At 21:00, Jellicoe, conscious of the Grand Fleet’s deficiencies in night fighting, decided to try to avoid a major engagement until early dawn. Scheer opted to cross Jellicoe’s wake and escape via Horns Reef. Luckily for Scheer, most of the light forces in Jellicoe’s rearguard failed to report the seven separate encounters with the German fleet during the night; the very few radio reports that were sent to the British flagship were never received, possibly because the Germans were jamming British frequencies. Whilst the nature of Scheer’s escape, and Jellicoe’s inaction, indicate the overall German superiority in night fighting, the results of the night action were no more clear-cut than were those of the battle as a whole.
More can be said about events during the night, but as both the Grand Fleet and the High Seas Fleet could claim to have at least partially satisfied their objectives, both Britain and Germany have at various points claimed victory in the Battle of Jutland. There is no consensus over which nation was victorious, or if there was a victor at all. At midday on 2 June, German authorities released a press statement claiming a victory. The victory of the Skagerrak was celebrated in the press, children were given a holiday and the nation celebrated. The Kaiser announced a new chapter in world history. Post-war, the official German history hailed the battle as a victory and it continued to be celebrated until after World War II. In Britain, the first official news came from German wireless broadcasts. Ships began to arrive in port, their crews sending messages to friends and relatives both of their survival and the loss of some 6,000 others. The authorities considered suppressing the news, but it had already spread widely. Some crews coming ashore found rumours had already reported them dead to relatives, while others were jeered for the defeat they had suffered. At 19:00 on 2 June, the Admiralty released a statement based on information from Jellicoe containing the bare news of losses on each side. The following day British newspapers reported a German victory and the British population was shocked that the long anticipated battle had been a victory for Germany. On 7 June the German admission of the losses of Lützow and Rostock started to redress the sense of the battle as a loss. International perception of the battle began to change towards a qualified British victory, the German attempt to change the balance of power in the North Sea having been repulsed. A German naval expert, writing publicly about Jutland in November 1918, commented, “Our Fleet losses were severe. On 1 June 1916, it was clear to every thinking person that this battle must, and would be, the last one”. More has been written regarding the battle, gunnery, shell performance, ammunition, signalling and losses on both sides. Suffice to say it was not a battle that would be played out like this again. In July, bad news from the Somme campaign swept concern over Jutland from the British consciousness.
This week…
A personal note. My maternal grandfather was on a British ship which was torpedoed at the Battle of Jutland. Happily he survived, and having spent five hours in the water he was picked up by a passing British ship. At first they thought he was a German, but a tirade of Anglo-Saxon expletives soon made them realise their initial mistake. Thankfully for me and all my family!
Click: Return to top of page or Index page